Lactate-E 2.0 Help
Disclaimer:
This software eases the calculation of lactate endurance markers.
Results should only be interpreted by a trained professional. Microsoft Excel was chosen
as the program environment in order to increase the ease of use of the software. Due
to the nature of Excel however, some markers will on occasion be miscalculated, such
mistakes should be easy for a professional to recognise but not for the lay user.
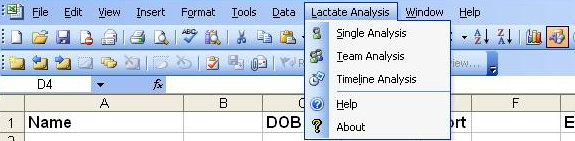
In order to start Lactate-E first open Microsoft Excel. Ensure that Macros are enabled by clicking on Macro on the Tools menu and selecting Security. The security level must be set to Medium or lower for Lactate-E to be allowed to run. Now, to start Lactate-E, from the Excel File menu click on Open. In the dialog box navigate to the folder into which you installed Lactate-E. Select the file Lactate-E.xls and click Open. If a security warning appears you must select Enable Macros in order for Lactate-E to run. The Lactate-E worksheet should appear and a message box should pop up stating, "Lactate Analysis Software Installed." A new menu will also be installed in the toolbar entitled Lactate Analysis. This menu can be used to access the features of the software.
Back
In order to close Lactate-E first ensure that all Lactate-E dialog boxes are closed, by clicking Cancel on them. Then, with the Lactate-E worksheet open in front of you, click on Close from the File menu . You should be left with a blank Excel window, with no worksheet open in it, in front of you. You are now free to work on other problems or close Excel entirely. Please note if your intention is to exit Excel entirely it is ok to choose Exit from the File menu while the Lactate-E worksheet is still open. Lactate-E will be automatically closed before the window exits.
Back
Single mode can be used to calculate the lactate endurance markers for a single athlete at a time. In addition to calculating the endurance markers it can produce graphs of workload vs lactate, workload vs heartrate and a combined graph of both of the previous graphs. It can also be used to calculate training zones according to a number of schemes published in the literature.
In order to analyse the data from a single athlete follow this step by step procedure:
- Arrange Data
- Choose "Single Analysis" from the Lactate Analysis drop down menu in the Excel menubar.
- Choose your desired Options.
Lactate-E saves your options between uses so if you wish to use your last options again you can skip this step.
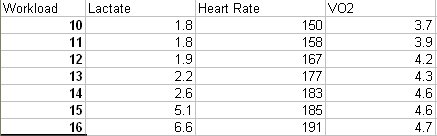
- Select workload values.
In the lactate analysis program box, click the mouse cursor in the range box to the right of the label for "Workload:" then select the workloads at which the athlete was measured in the test. As you are selecting the workloads the athlete was measured at you should see text appearing in the range box similar to that in this picture
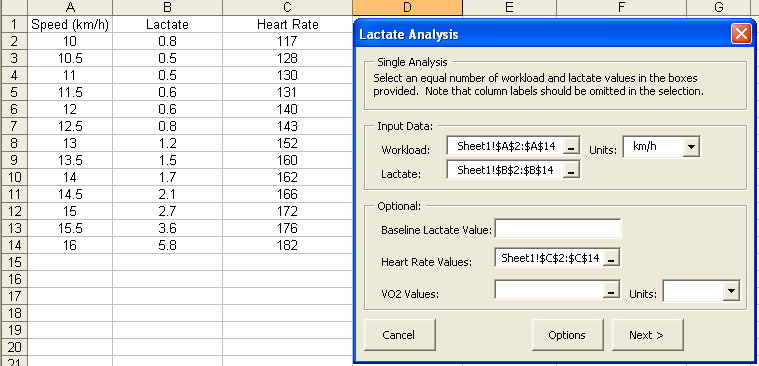
- Select lactate values.
Click the mouse cursor in the range box to the right of the label for "Lactate:". Select the recorded lactate values, following the same procedure as with selecting the workload values.
- Choose workload units of measurement.
In the dropdown box to the right of the workloads range box select the units of measurement that the workload was measured in. If a suitable unit is not available it is possible to type it directly into the dropdown box.
Optionally:
- Enter baseline lactate value.
In the box labelled "Baseline Lactate Value:" you may enter a resting lactate value for the athlete, if recorded. Some of the markers will use this as the baseline above which rises are measured. If you do not enter a value in this box the first recorded lactate value is taken as the baseline value.
- Select heartrate values.
If heartrate values were recorded during testing, click the mouse cursor in the range box to the right of the "Heart Rate Values:" label. Then select the heart rate values using the same procedure as that for the workload and lactate values.
- Select VO2 values.
If VO2 values were recorded during testing, click the mouse cursor in the range box to the right of the "VO2 Values:" label. Then select the VO2 values using the same procedure as that for the workload and lactate values.
- Choose VO2 units of measurement.
In the dropdown box to the right of the VO2 range box select the units of measurement that the VO2 uptake was measured in. If a suitable unit is not available it is possible to type it directly into the dropdown box.
Finally:
- Click the button labelled "Next"
If you wish to cancel at any stage click the button labelled "Cancel".
Back
Team mode can be used to calculate the individual lactate endurance markers for a group of athletes all at once. In addition to calculating the endurance markers it can produce graphs of workload vs lactate, workload vs heartrate and a combined graph of both of the previous graphs. It can also be used to calculate training zones according to a number of schemes published in the literature.
In order to analyse the data from a group of athletes follow this step by step procedure:
- Arrange Data
- Choose "Team Analysis" from the Lactate Analysis drop down menu in the Excel menubar.
- Choose your desired Options.
Lactate-E saves your options between uses so if you wish to use your last options again you can skip this step.
- Select workload values.
In the lactate analysis program box, click the mouse cursor in the range box to the right of the label for "Workload:" then select the workloads at which the athlete was measured in the test. As you are selecting the workloads the athlete was measured at you should see text appearing in the range box similar to that in this picture
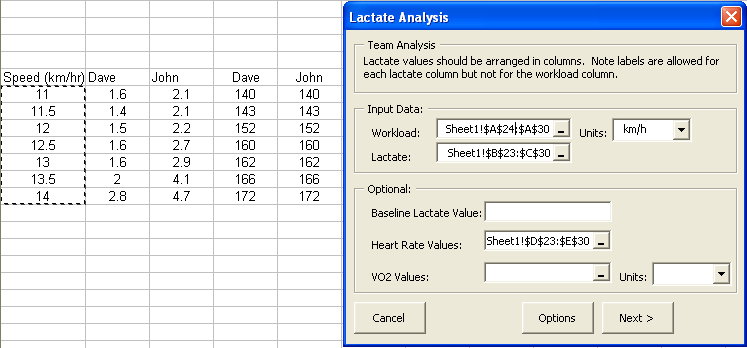
- Select lactate values.
Click the mouse cursor in the range box to the right of the label for "Lactate:". In selecting the recorded lactate values there are two alternative procedures you may follow. You may simply select all of the lactate values; which should have the same number of rows as the workload values and one column corresponding to each athlete. Or you may wish to top each column of lactate values with a name or other label to identify the athlete those values belong to, you can then select the row of labels along with the block of lactate values; in this case the lactate data will have one row more than the workload data and one column corresponding to each athlete.
Note: When working with multiple athlete's data the athletes may not have performed the tests at the same workload values, it is ok if the differences are only on the higher or lower ends of the workloads, but there cannot be any gaps in the middle of the table of lactate values (See Arranging the Data). If there are gaps the athletes' sessions must be analysed separately. It is also important to select a full rectangular area of lactate values even if some columns don't extend fully to the top or bottom of the selected area, as long as at least one column extends to each margin.
- Choose workload units of measurement.
In the dropdown box to the right of the workloads range box select the units of measurement that the workload was measured in. If a suitable unit is not available it is possible to type it directly into the dropdown box.
Optionally:
- Enter baseline lactate value.
In the box labelled "Baseline Lactate Value:" you may enter a resting lactate value for the athletes, if recorded. Some of the markers will use this as the baseline above which rises are measured. Only one value may be entered in this box so it is unlikely to be of much use with a group of athletes. If you do not enter a value in this box the first recorded lactate value, for each athlete, is taken as their individual baseline value.
- Select heartrate values.
If heartrate values were recorded during testing, click the mouse cursor in the range box to the right of the "Heart Rate Values:" label. Then select the heart rate values using the same procedure as that for the lactate values.
- Select VO2 values.
If VO2 values were recorded during testing, click the mouse cursor in the range box to the right of the "VO2 Values:" label. Then select the VO2 values using the same procedure as that for the lactate values.
- Choose VO2 units of measurement.
In the dropdown box to the right of the VO2 range box select the units of measurement that the VO2 uptake was measured in. If a suitable unit is not available it is possible to type it directly into the dropdown box.
Finally:
- Click the button labelled "Next"
If you wish to cancel at any stage click the button labelled "Cancel".
Back
Timeline mode can be used to calculate the lactate endurance markers for multiple testing sessions for a single athlete. In addition to calculating the endurance markers it can produce graphs of workload vs lactate and workload vs heartrate.
In order to analyse the data from an athlete follow this step by step procedure:
- Arrange Data
- Choose "Timeline Analysis" from the Lactate Analysis drop down menu in the Excel menubar.
- Choose your desired Options.
Lactate-E saves your options between uses so if you wish to use your last options again you can skip this step.
- Select workload values.
In the lactate analysis program box, click the mouse cursor in the range box to the right of the label for "Workload:" then select the workloads at which the athlete was measured in the test. As you are selecting the workloads the athlete was measured at you should see text appearing in the range box similar to that in this picture
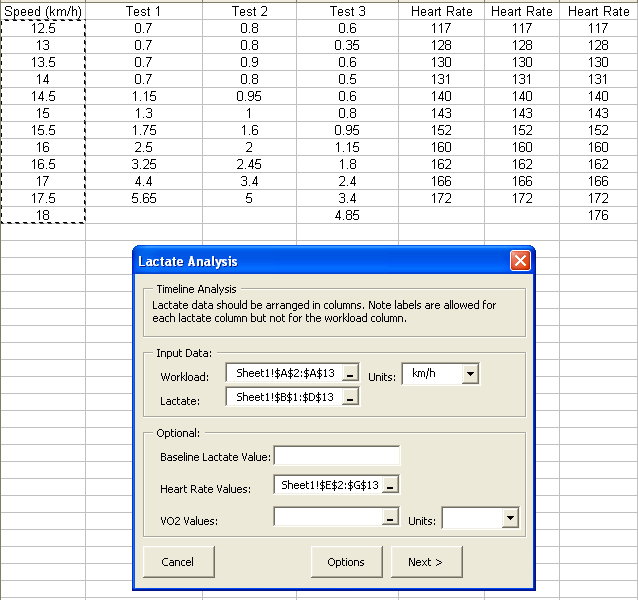
- Select lactate values.
Click the mouse cursor in the range box to the right of the label for "Lactate:". In selecting the recorded lactate values there are two alternative procedures you may follow. You may simply select all of the lactate values; which should have the same number of rows as the workload values and one column corresponding to each testing session. Or you may wish to top each column of lactate values with a date or other label to identify the testing session those values belong to, you can then select the row of labels along with the block of lactate values; in this case the lactate data will have one row more than the workload data and one column corresponding to each testing session.
Note: When working with tests over time the athlete may not have performed each test at the same workload values, it is ok if the differences are only on the higher or lower ends of the workloads, but there cannot be any gaps in the middle of the table of lactate values (See Arranging the Data). If there are gaps the testing sessions must be analysed separately. It is also important to select a full rectangular area of lactate values even if some columns don't extend fully to the top or bottom of the selected area, as long as at least one column extends to each margin.
- Choose workload units of measurement.
In the dropdown box to the right of the workloads range box select the units of measurement that the workload was measured in. If a suitable unit is not available it is possible to type it directly into the dropdown box.
Optionally:
- Enter baseline lactate value.
In the box labelled "Baseline Lactate Value:" you may enter a resting lactate value for the athlete, if recorded. Some of the markers will use this as the baseline above which rises are measured. Only one value may be entered in this box so it is unlikely to be of much if there is a long interval between the tests. If you do not enter a value in this box the first recorded lactate value, for each testing session, is taken as that session's baseline value.
- Select heartrate values.
If heartrate values were recorded during testing, click the mouse cursor in the range box to the right of the "Heart Rate Values:" label. Then select the heart rate values using the same procedure as that for the lactate values.
- Select VO2 values.
If VO2 values were recorded during testing, click the mouse cursor in the range box to the right of the "VO2 Values:" label. Then select the VO2 values using the same procedure as that for the lactate values.
- Choose VO2 units of measurement.
In the dropdown box to the right of the VO2 range box select the units of measurement that the VO2 uptake was measured in. If a suitable unit is not available it is possible to type it directly into the dropdown box.
Finally:
- Click the button labelled "Next"
If you wish to cancel at any stage click the button labelled "Cancel".
Back
In order to allow Lactate-E to know which workloads correspond to which lactate values it is important to correctly arrange the data prior to analysis. Unless otherwise stated Lactate-E assumes the data is arranged in columns, with the top element in the column corresponding to the first recording during testing and the bottom entry corresponding to the final recording during testing. All elements in between should be in the order they were recorded during testing.
We suggest the follwing layout for Simple Mode:
 In Team Mode it is important that the lactate values are organised in a block, with the heart rate values in a separate block and the VO2 values in another block. We find it useful to label each column with a player id, Lactate-E can use the player ids to label the individual results output. We suggest the following layout for your data:
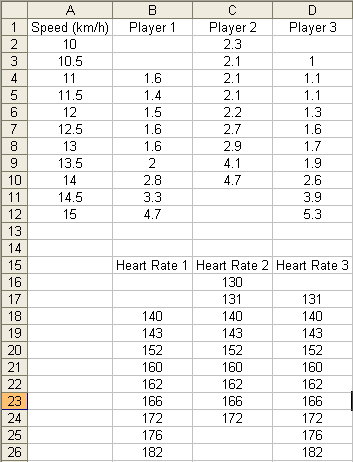
As can be seen from the image if one athlete is measured at a lower workload than the other athletes then blank cells must be left at this workload for the other athletes. Likewise if an athlete, or athletes, is measured at a workload higher than the other athletes blanks must be left for the athletes who did not perform the test at that workload. Note: Blanks can not be left in the middle of an athlete's test data, if an athlete does not perform the test at the same intervals as the other athletes then their data must be analysed separately.
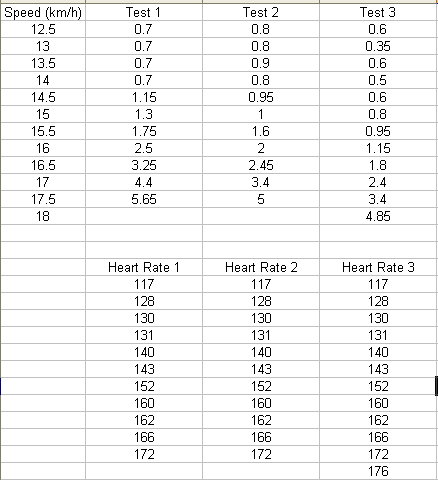
In Timeline Mode the data must be arranged as in Team Mode. We suggest that each column of lactate data is headed by an identifier such as the date of testing or a label in order to identify each set of results in the final output. Example of data arrangement for Timeline Mode:
Back
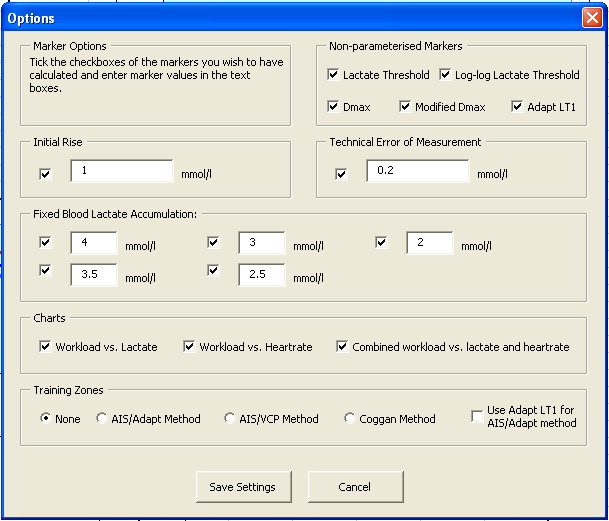 There are a number of different sections in the Options Pane of Lactate-E. The top half of the box controls which lactate markers are calculated, and if the markers have parameters which can be modified they can be set here. The next section of the box controls which charts will be produced alongside the markers. The final section controls the calculation of training zones.
Checkboxes and radio buttons control whether an individual feature is enabled or disabled. Click on them to enable/disable a feature. The modifiable parameters are better explained in the markers section of this help file, once you understand their operation enter the new parameter value in the appropriate textbox.
Click the button labelled "Save" to keep changes for future (and current) use.
There are a number of different sections in the Options Pane of Lactate-E. The top half of the box controls which lactate markers are calculated, and if the markers have parameters which can be modified they can be set here. The next section of the box controls which charts will be produced alongside the markers. The final section controls the calculation of training zones.
Checkboxes and radio buttons control whether an individual feature is enabled or disabled. Click on them to enable/disable a feature. The modifiable parameters are better explained in the markers section of this help file, once you understand their operation enter the new parameter value in the appropriate textbox.
Click the button labelled "Save" to keep changes for future (and current) use.
Click the button labelled "Cancel" to discard changes and return to the main Lactate-E screen.
Back
Click on the checkboxes to enable or disable which markers are calculated. Those that take parameters can be modified by entering the new parameter in the textbox beside the marker checkbox.
Non-parameterised markers
- Lactate Threshold. We use a broken stick model to solve the lactate threshold marker. We divide the recorded workload/lactate pairs into two groups and draw a straight line through each group of points. By varying the membership of the groups we minimise the sum of the squared error between the lines and the points they fit. The lactate threshold marker is the intersection point of the two lines where the sum of the squared error is a minimum.
- Log-log Lactate Threshold is calculated in the same manner as the Lactate threshold marker but the log of the workloads and lactate values are used instead of the original measured values.
- Dmax. The workload/lactate pairs are interpolated by a degree three polynomial. We also draw a straight line between the first workloads/lactate pair and the last workload lactate pair. The Dmax marker is the point on the interpolated line parallel to the straight line.
- Modified Dmax is calculated in a similar manner to the Dmax but the straight line is drawn from the recorded workload/lactate pair directly preceding a 0.4mmol rise in lactate, to the highest workload/lactate pair, instead of from the first workload/lactate pair.
- Adapt LT1 is the recorded workload directly preceding a 0.4mmol rise in lactate above baseline.
Parameterised markers
The parameterised markers all use a degree three polynomial to interpolate the workload/lactate points. From this we can calculate the workload corresponding to any lactate value. In the following descriptions x corresponds to the variable entered in the textbox in the options pane corresponding to the marker under description.
- Initial Rise is the workload corresponding to the baseline lactate value plus x.
- Technical Error of Measurement (TEM) is used to measure when the blood lactate value has changed by more than the limit of measurement of the testing equipment. It is the workload corresponding to the baseline lactate value plus x.
- Fixed Blood Lactate Accumulations, of which it is possible to calculate 5 at a time with our software, are the workloads corresponding to x.
Back
Any combination of the following three graphs can be produced for individual athlete's results in either Single Mode or Team Mode operation. In Timeline Mode only the first two graphs can be produced. Simply click on the check box, so that a tick mark appears, in the Charts section of the option pane for the graphs you wish displayed, as in the follwing picture:

If no heartrate values are available for an athlete then the graphs containing heartrates will not be drawn, even if the checkbox is ticked.
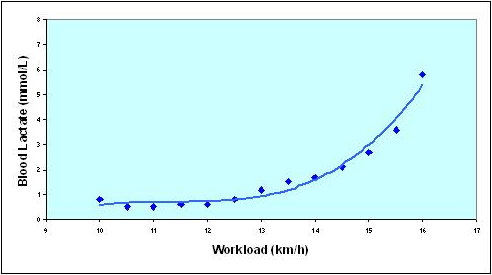
Graph of workload against lactate values:
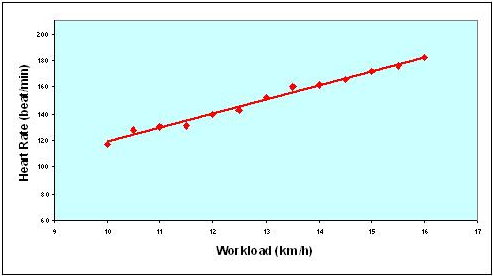
Graph of workload against heartrate values:
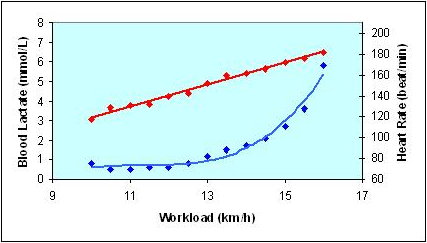
Combined graph of workload against lactate and heartrate values:
Back
Training zones are calculated from the heartrate values as follows:
AIS/Adapt Method
LT1 = Heart rate equivalent to 0.4mmol rise in lactate above baseline.
LT2 = Heart rate equivalent to Modified Dmax marker.
| z1: |
x < LT1 |
| z2: |
LT1 < x < LT1 + ((LT2 - LT1)/2) |
| z3: |
LT2 - ((LT2 - LT1)/2) < x < LT2 |
| z4: |
LT2 - 3 < x < LT2 + 3 |
| z5: |
x > LT2 + 4 |
AIS/VCP Method
LT2 = Heart rate equivalent to Modified Dmax marker.
| z1: |
x < 80% LT2 |
| z2: |
81% LT2 < x < 85% LT2 |
| z3: |
86% LT2 < x < 95% LT2 |
| z4: |
96% LT2 < x < 102% LT2 |
| z5: |
x > 103% LT2 |
Coggan Method
LT1 = Heart rate equivalent to 1mmol rise in lactate above baseline.
| z1: |
x < 68% LT1 |
| z2: |
69% LT1 < x < 83% LT1 |
| z3: |
84% LT1 < x < 94% LT1 |
| z4: |
95% LT1 < x < 105% LT1 |
| z5: |
x > 106% LT1 |
Choose which method you want by clicking the radio button beside it. The zones will be displayed in the lower right-hand corner of the output sheet. If you do not wish for training zones to be calculated select "None".
The alternative LT1 is calculated as the recorded workload preceding a rise of 0.4 mmol/l in lactate above baseline. This is calculated only from recorded values and does not use an interpolated line to find point in between recorded values. Click checkbox labelled "Use Adapt LT1 for AIS/Adapt method" to enable it as the LT1 value in the AIS/Adapt method of calculating training zones.
Back
J. Newell, D. Higgins, N. Madden, J. Cruikshank, J. Einbeck, K. McMillan and R. McDonald. Software For Calculating Blood Lactate Endurance Markers. Journal of Sports Sciences, 25:12 (2007), pg 1403-1409.
Back
Author: David Higgins
Last Revised: 2 September, 2008